This guide covers everything you need to know about cut photo recovery. From knowing the reasons for photo loss to exploring 2 efficient ways to recover photos lost in cut and paste.

“How to recover photos lost in cut and paste? I recently tried to transfer about a thousand photos from my Android phone to my computer using the cut-paste method. However, many photos were lost and only 200 photos were saved in the folder. How do I perform cut photo recovery? I really need your help. Thank you!”
Frequent cut and paste operations sometimes lead to accidental loss of photos. If you also encounter this situation and want to recover cut and pasted photos. Don't worry, you can recover cut photos. This guide will provide 2 methods to effectively recover photos lost in cut and paste and guide you through the steps smoothly.

Most people use the Cut + Paste or Copy + Paste commands to transfer photos between drives. The Cut command removes the selected photos from their original location, while the Copy command creates a duplicate.
Both commands save the selected photos in a temporary storage tool called the Clipboard, from which they can be inserted into the new location using the Paste command. However, cut photo loss often occurs during this process.
⚠ Note:
💥 Incomplete Operation: If the cut-paste process is interrupted or incomplete, the file may not be pasted to the new location.
🐱🏍 Accidental Deletion or Formatting: You might accidentally delete the file or format the drive before pasting the file.
🎏 Device Loss: If you cut files from your computer and paste them to an external device that is subsequently lost, the files are lost as well.
To prevent data loss, avoid writing new data to the drive and use reliable recovery software. Also, do not shut down your computer, as this can make recovery more difficult.
Here are 2 ways to recover photos lost in cut and paste. If you don't enable File History and don't have a backup on your computer. Trying professional data recovery software is the best option.
The most reliable and effective way to recover cut photos is by using reliable and user-friendly photo recovery software - MyRecover. It supports recover lost or deleted photos from various devices and applies to any data loss situation, such as accidental deletion, disk formatting, virus infection, computer crashed recovery, etc.
Key features of it:
The free edition of MyRecover allows you to recover 500 MB files at no cost. So, free download and install it to your computer to have a try. Here’s a step-by-step guide to perform cut photo recovery easily.
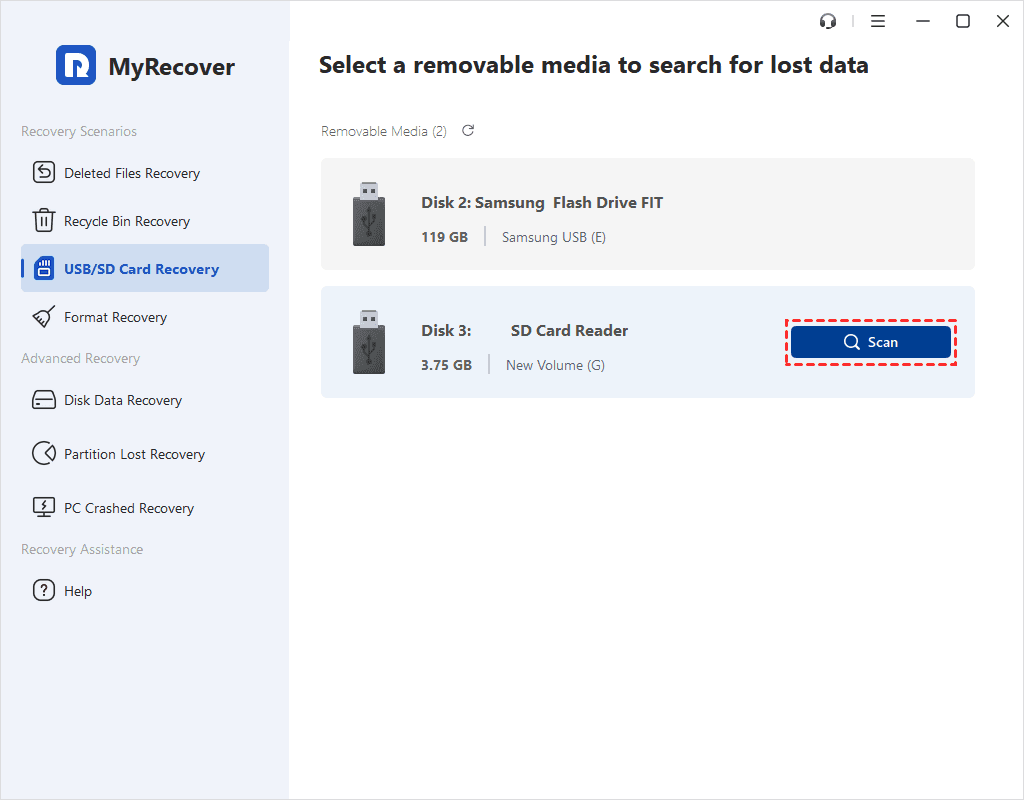
Step 1. Run MyRecover and hover over the drive or partition from which you want to recover cut photos. Then, click Scan.
🤞 Tip: If you need to recover cut photos or other files larger than 500MB, try upgrading to MyRecover Pro or Technician to enjoy unlimited recovery size.
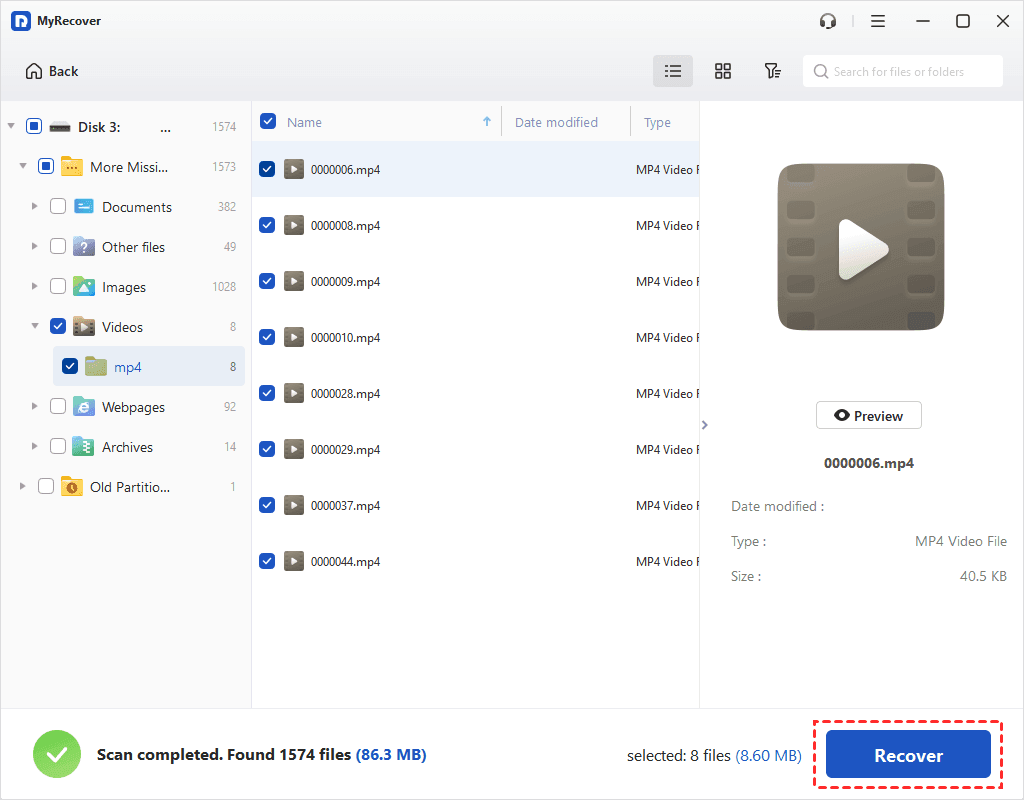
Step 2. MyRecover will search for all lost and deleted files through a quick scan or deep scan. You can filter and preview your cut photos before recovery.
🤞 Tip: Try to use the Filter or Search feature to find your cut files quickly.
Step 3. Select the photos you want to recover and click on Recover X Files. Choose a different location rather than the original location to save them. Otherwise, the lost cut photos could be overwritten.
How to recover cut files from PC? Windows has many built-in utilities to avoid accidental data loss. If you have enabled File History and have the backups on your computer, then you can also recover cut photos from File History.
Step 1. Type Control Panel in the search bar and open it > Choose File History > Restore your files with File History.
Step 2. Find the cut photo you want to recover > Click the Restore option. The process may take a few moments to restore the selected files.
In your daily life and work, you often use the Copy, Cut, Delete, and Paste actions. Understanding the differences between these shortcuts and how they work is essential.
◼ Copy (Ctrl + C): Making a duplicate of the original file that can be moved or edited without altering the original.
◼ Cut (Ctrl + X): Deletes the content from the screen if the items are inside a file but keeps them in memory.
◼ Delete (Ctrl + D): Deletes the content completely from the document. If the items are files or folders themselves, this moves them to the Recycle Bin.
◼ Paste (Ctrl + V): Used to make a cut or copied item appear again at a specific location.
⚠ Note: Everything will be erased from the clipboard when you turn off the computer. The cut files will be gone if you clear the clipboard.
When moving photos using cut and paste, it's important to be careful to avoid losing your files. Here are some simple tips to help keep your photos safe:
1️⃣Back up first: Before transferring photos, always make a copy of your photos on another device or in cloud storage. AOMEI Backupper Standard - a free and easy-to-use backup software for Windows may help you.
2️⃣ Use copy and paste: Copy and paste photos instead of cutting and pasting. This way, the original photos stay where they are until you confirm the transfer was successful.
3️⃣ Check space: Make sure there's enough space in the folder you're moving the photos to.
4️⃣ Avoid interruptions: Make sure your device is charged or plugged into a power source, and try not to use other apps while the transfer is in progress.
5️⃣ Transfer in batches: Move photos in smaller groups instead of all at once. This reduces the risk of losing all your files if something goes wrong.
6️⃣ Use a quality cable: Use a reliable USB cable and port to connect your phone or external drive to your PC.
Losing a cut photo doesn’t mean it’s gone forever. With the right approach and tools, you can recover cut photos easily. We recommend you try advanced software like MyRecover to perform cut photo recovery effortlessly. You can also use it to recover deleted files in Windows 10 in just 3 clicks. Therefore, download MyRecover and recover up to 500MB of files for free as soon as possible! Keep your data safe and get it back!
1. How to recover cut photos from iPhone?
Check Recently Deleted Folder: Open the Photos app, go to Albums, and check the "Recently Deleted" folder. Restore any photos if available.
Use iCloud Backup: If you have iCloud backups enabled, you can restore your iPhone to a previous backup that contains the lost photos.
Use iTunes Backup: Connect your iPhone to your computer, open iTunes, and restore from a previous backup.
Use Recovery Software: Use reliable iPhone photo recovery software like MyRecover for iOS to scan your iPhone and recover lost photos.
2. How to undo cut on iPhone?
After cutting text, give your iPhone a quick shake. A pop-up will appear, tap "Undo" to revert the action. If you want to return the text to its original place, tap the text field where you want to paste it. Tap "Paste" or use the pinch open gesture with three fingers to paste the text back.
3. How to undo a cut and paste on PC?
Press Ctrl + Z to undo the cut, and you may can see the lost cut files back on your USB or SD card.
4. How do I recover cut and paste files in Windows 11?
Download and run free file recovery software - MyRecover.
Hover over the drive and click Scan.
Preview and select the files, then click Recover X Files.
5. Where did my cut and paste go?
Files may be lost due to interruptions during the cut-and-paste process. Check the Recycle Bin or use recovery software to retrieve cut documents.