
How to Recover Deleted Browser History on a Laptop (Chrome, Edge, Firefox)
This in-depth guide covers 4 proven methods to recover deleted browser history on laptops, including Chrome, Edge, Firefox, and other browsers, using system backups, cached data, DNS logs, and recovery software.
By Emma / Updated on April 25, 2025
Is Deleted Browsing History Permanently Deleted?
Browsing history refers to the record of websites you’ve visited on your web browser (e.g., Chrome, Firefox, Edge). It helps you quickly revisit pages and allows browsers to improve loading speeds through caching. However, many users delete their history for privacy reasons. Is deleted browsinghistorypermanentlydeleted? Not always.
When you delete browsing history:
1. From Your Browser – It removes the visible log, but traces may remain in "Cache & Cookies" (unless cleared separately), "Browser’s Recovery Files" (e.g., Chrome’s "Session Restore") or "Search Engine Accounts".
2.From Your Device– Deleted history can sometimes be recovered via System Backups (e.g., Time Machine on macOS, Windows backups).
In short, deleted browsing history is mostly gone from your device but may persist in backupsornetwork logs. Moreover, the deleted history may always be recoverable.
How to Recover Deleted Browser History?
If you accidentally cleared your browsing history and need to recover it, here are some methods depending on where the data might still exist:
Method 1. Restore Deleted Browser History By Local History File
Each browser has built-in local history features that may help recover deleted history. Below are detailed steps for Chrome, Firefox, Edge,
Google Chrome: Recover Browsing History
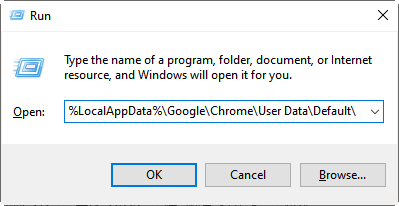
Step 1. Navigate to Chrome’s profile folder:Press Win+ R, input "%LocalAppData%\Google\Chrome\User Data\Default\"and press Enter.
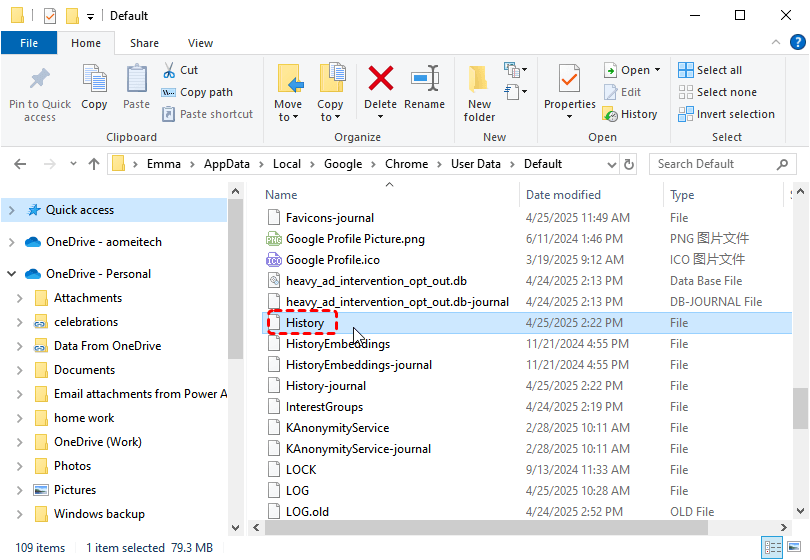
Step 2. Look for these files: History (main database) or History-journal (temporary logs)
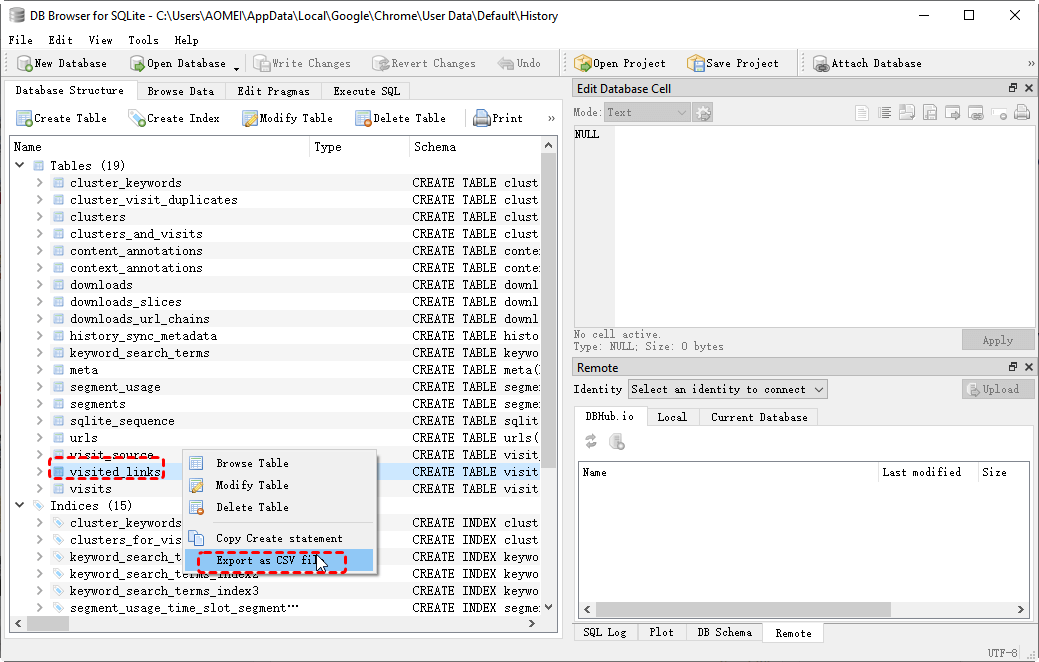
Step 3. Download DB Browser for SQLite (such as sqlitebrowser.org)and open History file.
Step 4. Find the "visited-links" and export it as .csv file.
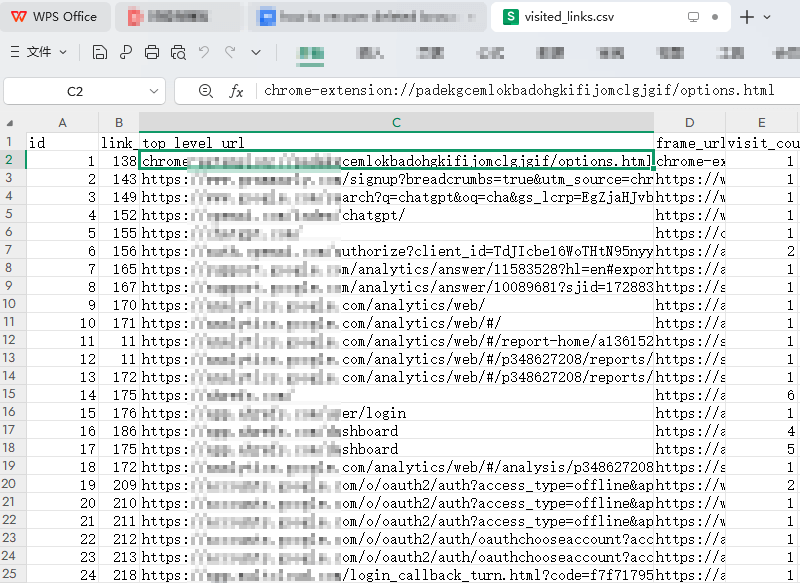
Then, you can open the .csv file to check the deleted browsing history.
Mozilla Firefox: Recover Browsing History
Firefox stores all browsing history in a SQLite database file (places.sqlite). Even if deleted, it may still be recoverable.
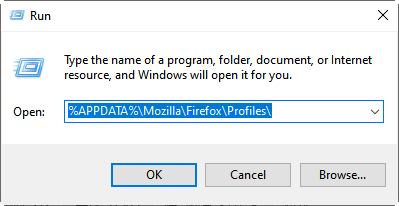
Step 1. Press Win + R, type: %APPDATA%\Mozilla\Firefox\Profiles\ and press on Enter.
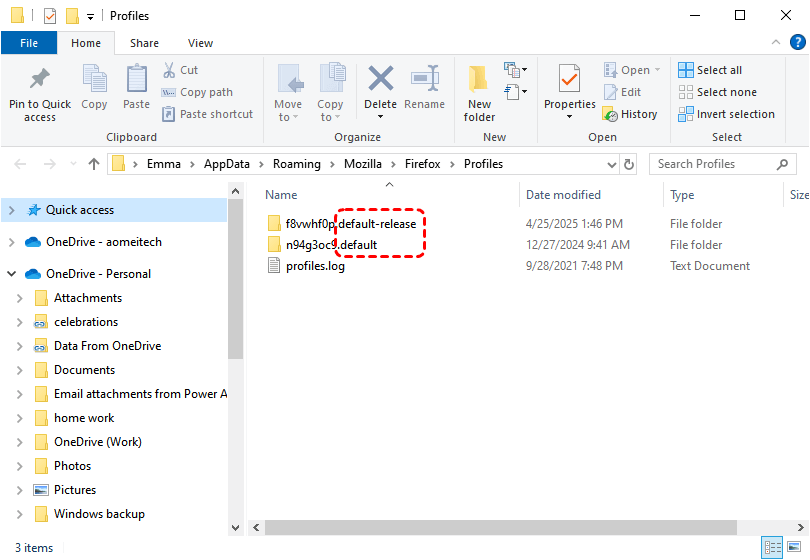
Step 2. Open the folder with .default or .default-release in its name.
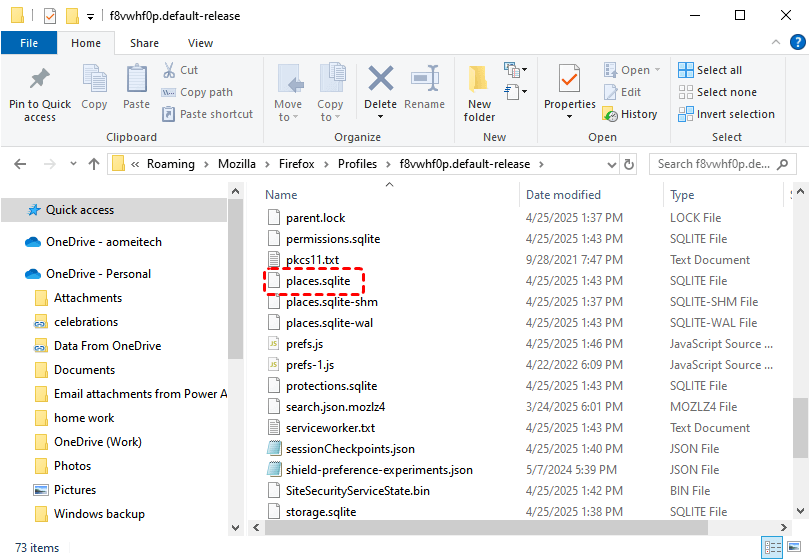
Step 3. Inside the profile folder, look for:
- places.sqlite: Contains browsing history, bookmarks, and downloads.
- places.sqlite-wal: Temporary logs (may have recent changes).
- places.sqlite-shm: An index for the WAL file, helping SQLite manage concurrent access efficiently
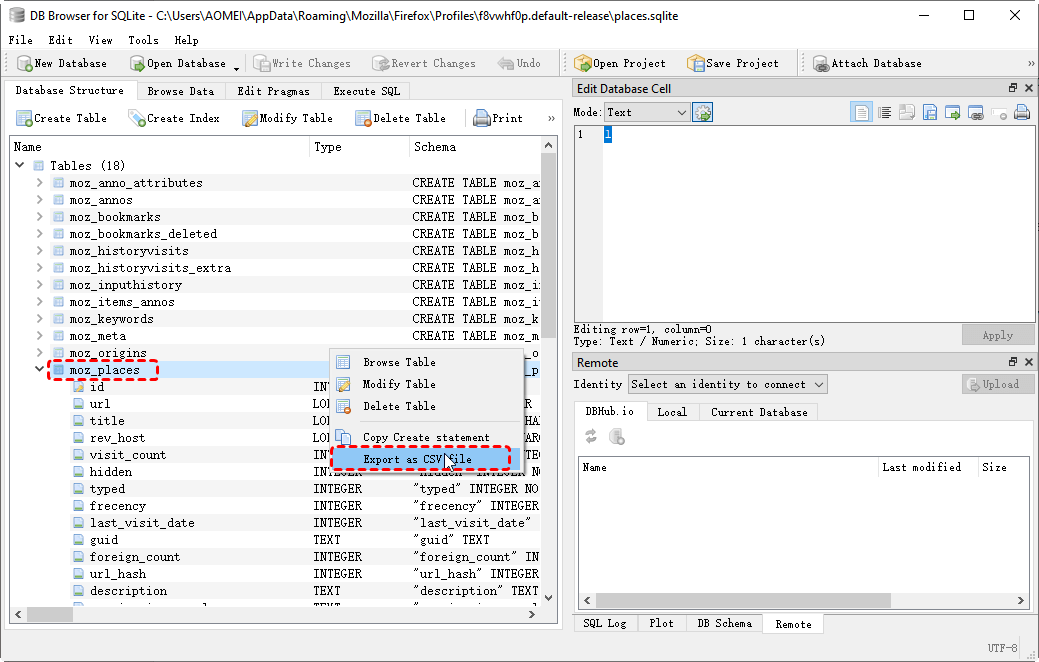
Step 4. Open places.sqlite using theDB Browserfor SQLitetool.
Step 5. Go to the "moz_places" table which contains all visited URLs. Export the data as CSV.
Then, you can open the .csv file to check the deleted browsing history.

Microsoft Edge: Restore Deleted Browsing History
Microsoft Edgestores browsing history in a SQLite database (History file). If you accidentally deleted history, you can recover the deleted browsing history by the following steps:
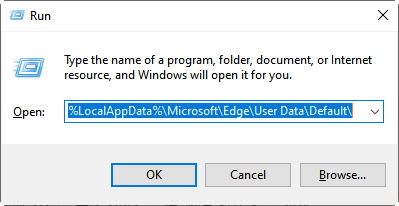
Step 1: Open Edge’s History databaseby pressing Win+R, inputting "%LocalAppData%\Microsoft\Edge\User Data\Default\" and hitting on "Enter".
Step 2. Locate the key files: History (main database) or History-journal (temporary logs).
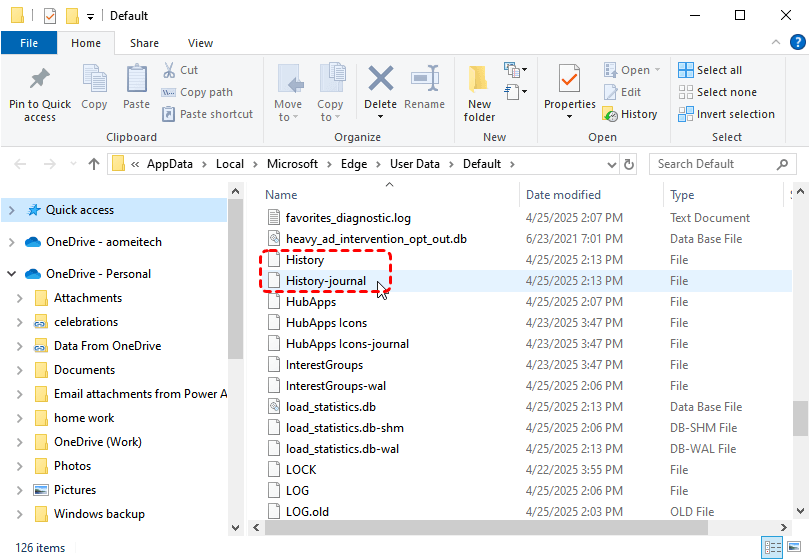
Step 3. Use the DB Browser for SQLite to open History file.
Step 4. Go to urls table (contains all visited links). Export data as CSV.
Method 2. Recover Deleted Browsing History by DNS Cache
When you visit websites, your computer stores their IP addresses in the DNS cache (even if browser history is deleted). This can help recover recently visited sites.
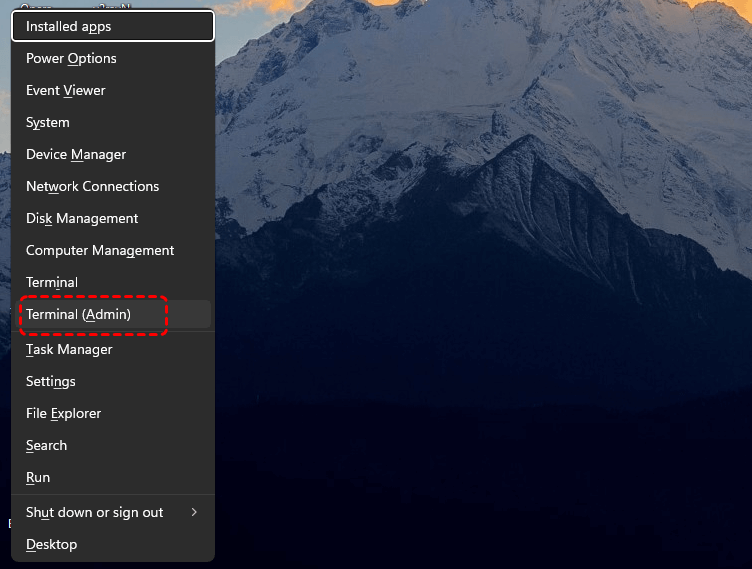
Step 1. Open Command Prompt as Admin: Press Win + X and select "Terminal (Admin)" or "Command Prompt (Admin) /Windows Powershell (Admin)".
Step 2. View DNS Cache:Type the command "ipconfig /displaydns " and hit on Enter. This lists all recently resolved domains (e.g., google.com).
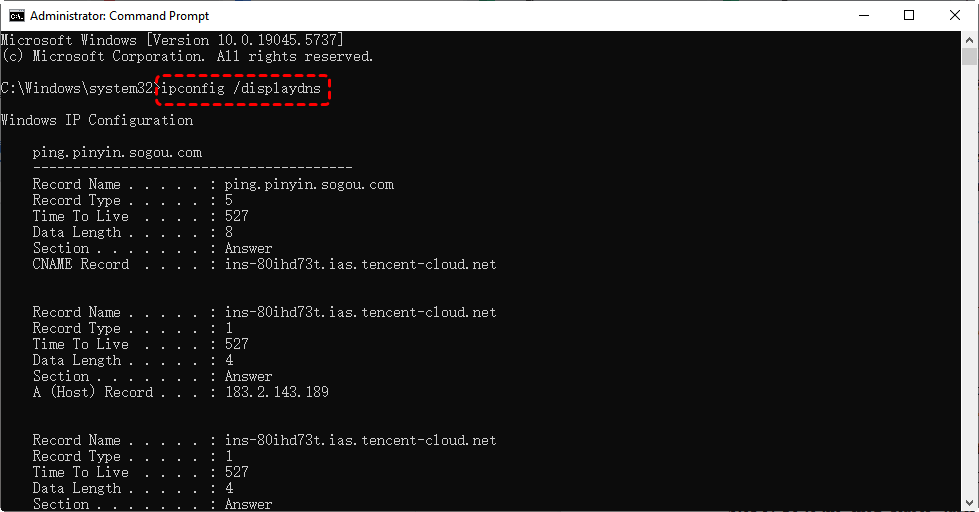
Step 3. Export DNS Cache: enter the command "ipconfig /displaydns > C:\dns_cache.txt"
Step 4. Open dns_cache.txt in Notepad.
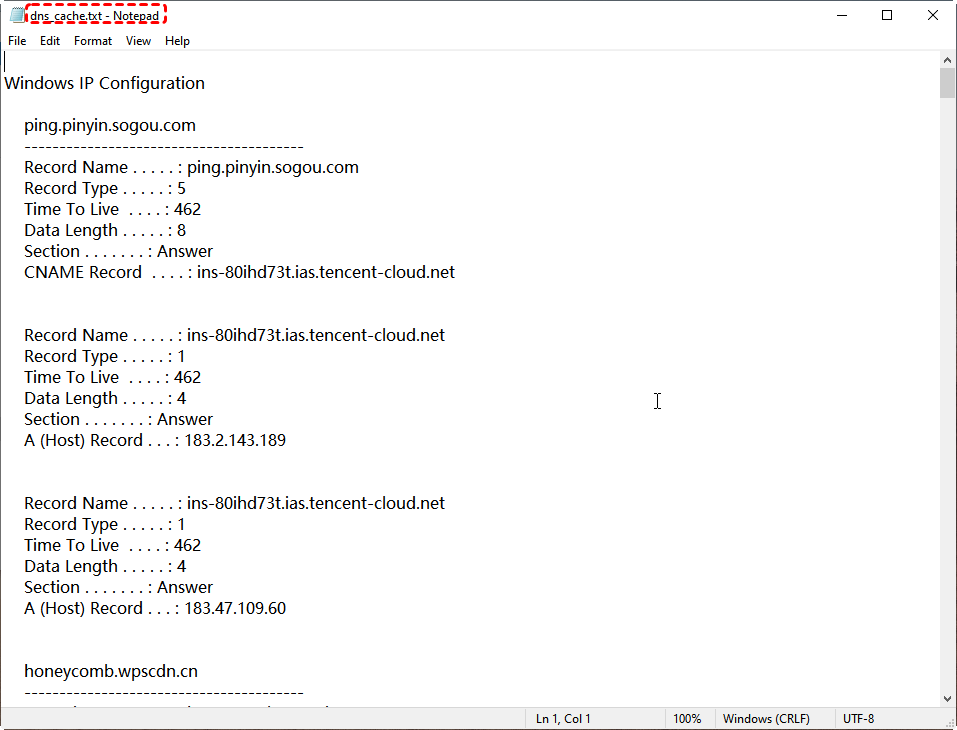
It will show domains visited through any browser (Chrome, Firefox, Edge, Safari, etc.)
Method 3. Recover Deleted Browsing History from Backup
If you enabled Windows File History or Backup & Restore, you may recover deleted local browser history file from a previous backup. This method works for Chrome, Firefox, Edge, and other browsers that store history in local files.
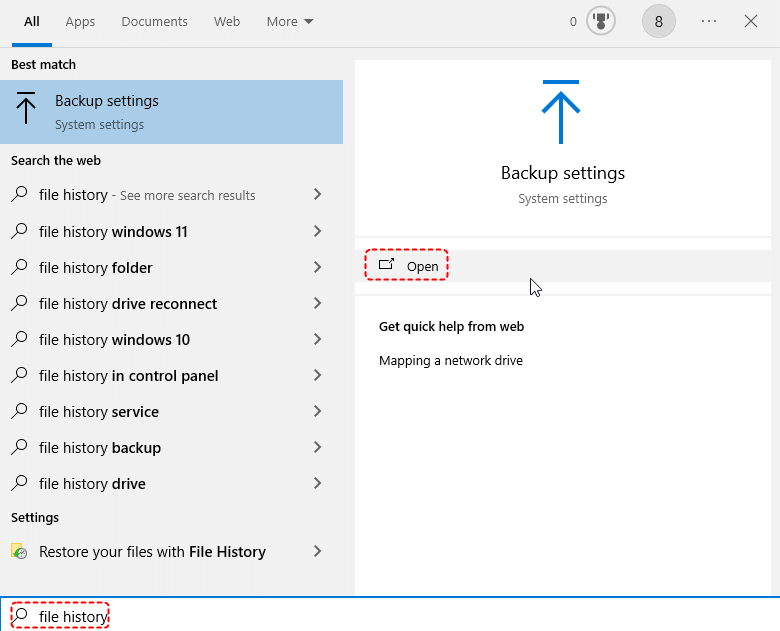
Step 1. Press Win + S, type "File History" in the search boxand click on "Open".
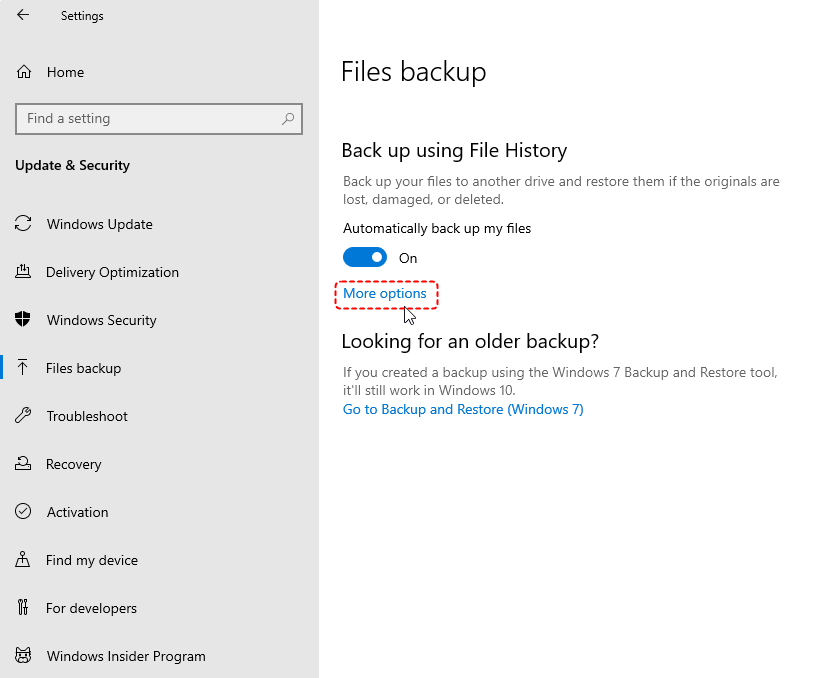
Step 2. Click "More Options".
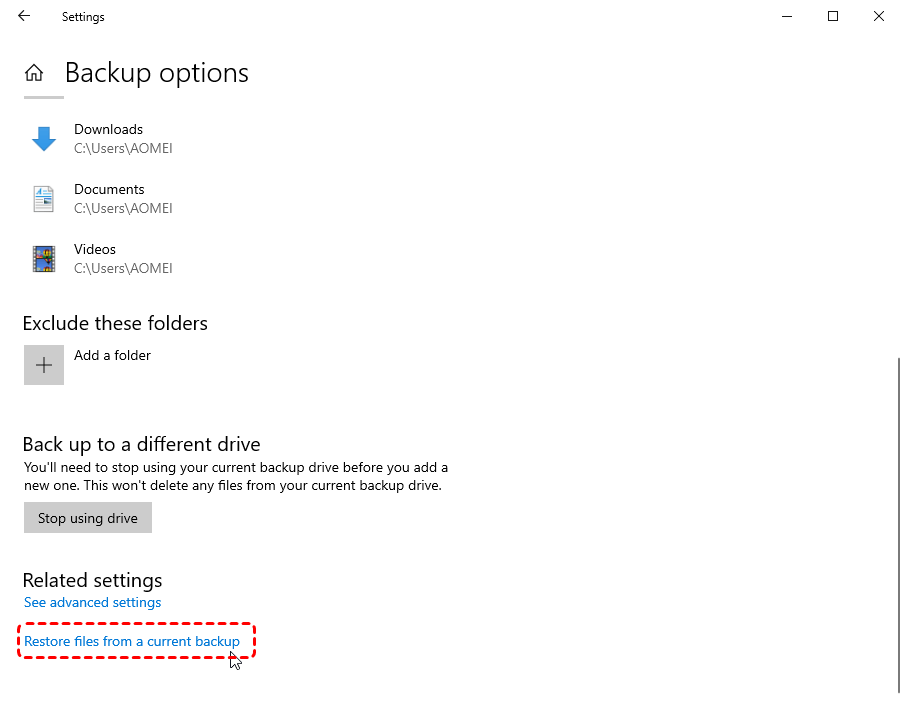
Step 3. Scroll down and click "Restore files from a current backup".
Step 4. Browse through the backup folder and choose the target one. Then click the green "Restore" button.
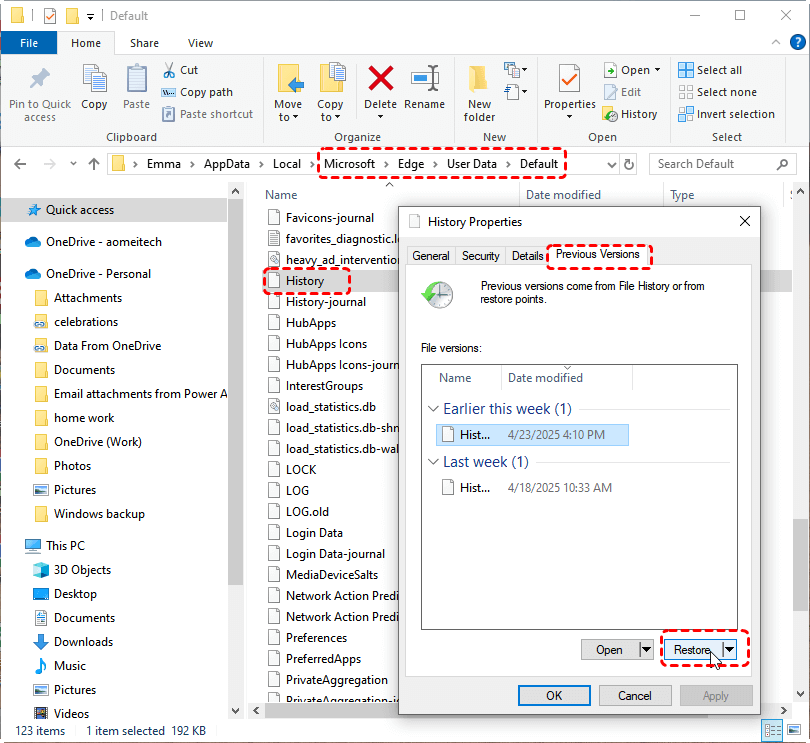
Alternatively, you can right-click the specific "history" file in specific browser local folder, choose "Restore previous versions". In the pop-out window, choose the proper version and click on "Restore" (the following screenshot is to recover deleted browser history in Edge).
Method 4. Recover Deleted Browsing History via MyRecover [Not Require Backup]
If you didn’t have enabled any Windows built-in backupfeatures,but need to recover deleted browser history, free MyRecover can help. It can scan your disk for missing or deleted local browser history files.

- Multiple Recovery Scenarios – Recovers deleted, formatted, or lost partition data, even after system crashes.
- Wide File Support– Restores documents, photos, videos, audio, and archives in various formats.
- Deep Scan Technology– Combines quick and deep scans for higher recovery success rates.
- User-Friendly Interface-Simple, guided steps make recovery accessible for all skill levels.
- Strong Compatibility – Works on Windows 7-11, all Servers and supports NTFS, FAT32, exFAT, etc.
- Safe & Read-Only – Scans without overwriting original data to prevent further damage.
- Multi-Device Support – Recovers data from HDDs, SSDs, USB drives, SD cards, and more.
- Fast Recovery – Optimized algorithms speed up scanning and retrieval.
Here’s how to use it for deleted browser history recovery:
Step 1. Download the free version from the official website and install it on your Windows PC. Avoid installing it on the same drive where your browser history was stored to prevent overwriting data.
Step 2. Launch MyRecover and choose the disk where your browser data was stored (usually C:for Windows users). and click on "Scan" button.

Step 3. It will start a quick scan to search for deleted files. If this mode fails to find the missing browser history files, turn to "Deep Scan"(older or heavily deleted files).
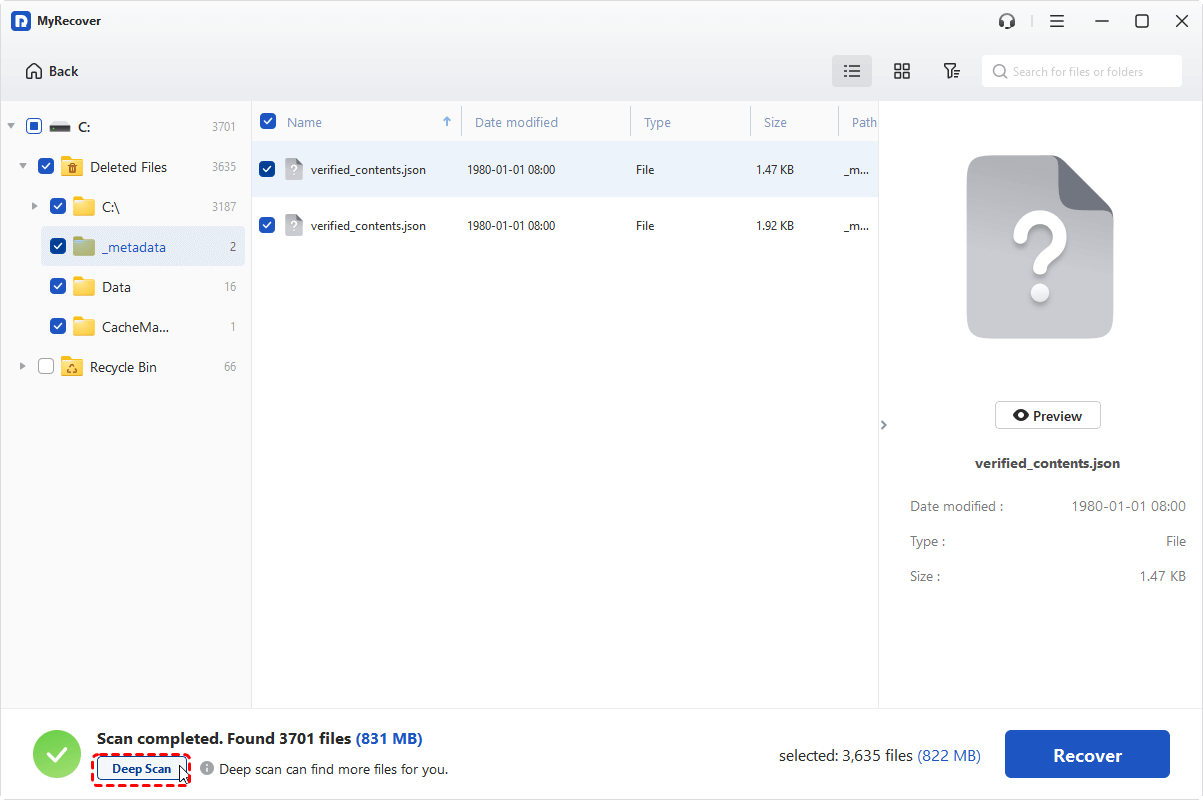
Step 4. After scanning, browse the results foryour target deleted browser history files. You can use filters (e.g., file type) to narrow down results.
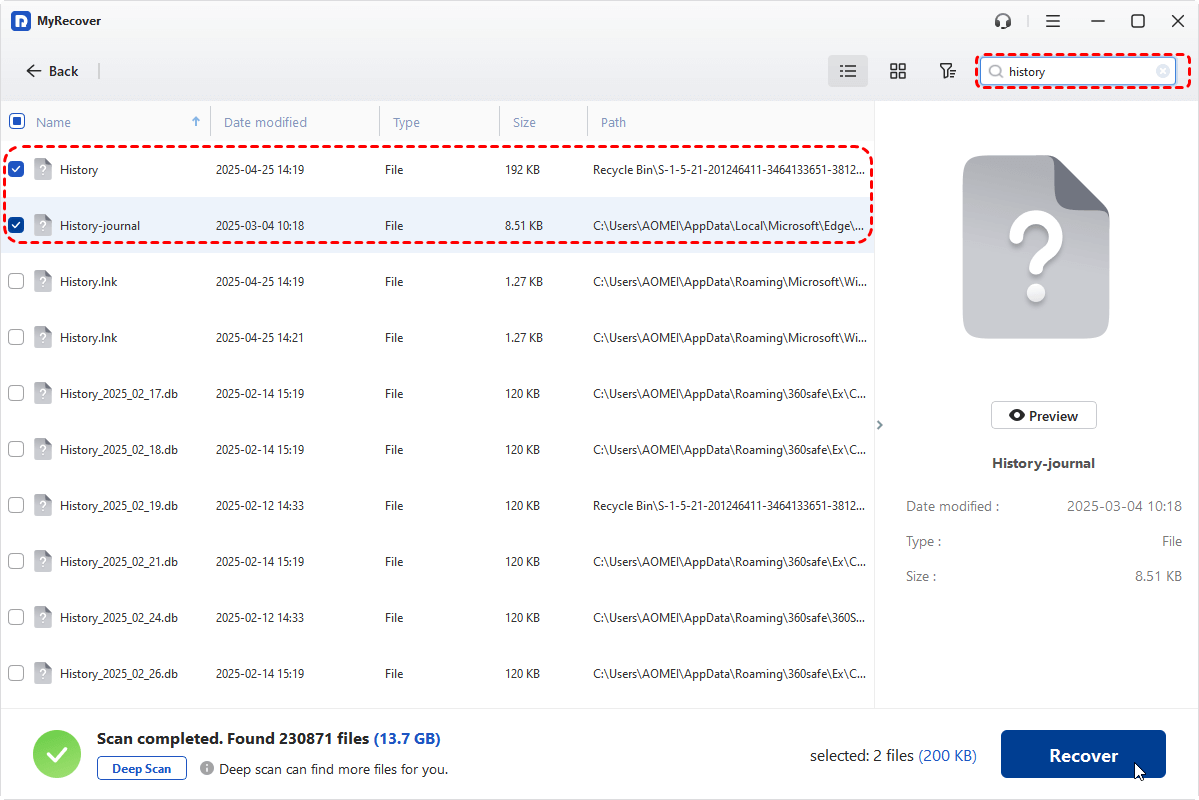
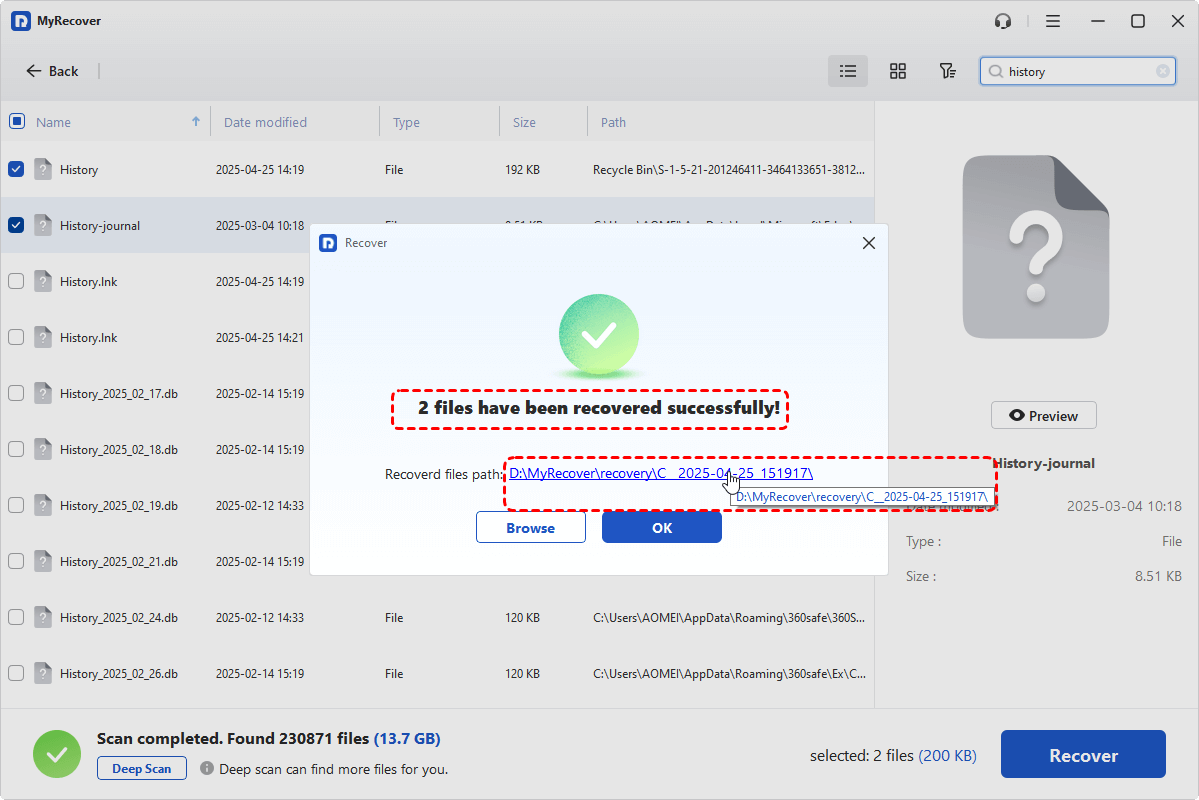
Step 5. Select the browser history files and click "Recover".
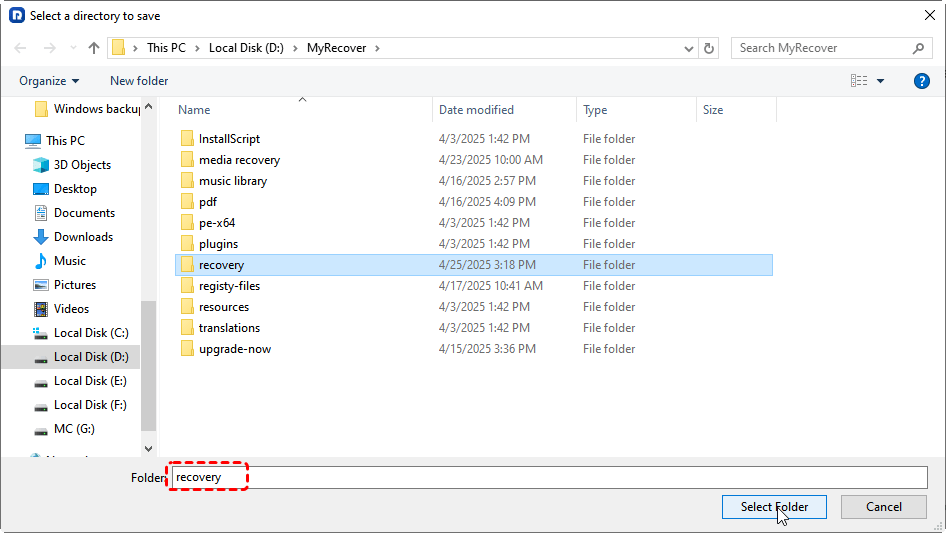
Step 6. Save them to a different drive (e.g., D:) to avoid corruption.
Finally, when the recovery is done, you can replace the existing "History"or "places.sqlite"file in your browser’s profile folder with the recovered one. Reopen the browser to check if the history is restored.
Summary
While permanently deleted history may not always be recoverable, these 4methods offer the best chance to restore lost browsing data. If one approach fails, try another—especially system backups or recovery softwarelike MyRecover. For heavy data recovery requirements like unlimited recovery quota, recovering data from crashed system, previewing files before recovery, etc, you can upgrade to Professional or Technician edition.

