
Lightroom The File Could Not Be Found? Find Missing Files!
Are you facing the "Lightroom the file could not be found" error? In this post, you will learn 6 different methods to fix it and recover missing files in Lightroom.
By Lori / Updated on January 24, 2025
If you've ever opened Adobe Lightroom Classic and been greeted with the dreaded "Lightroom The File Could Not Be Found" error, you're not alone. This issue can cause a lot of stress, especially when it affects your workflow and the photos you’ve worked hard on.
How to fix the "Lightroom the file could not be found" error? In this guide, we'll walk you through why this error occurs and the 6 feasible methods to recover missing files and photos in Lightroom Classic. Whether you're a seasoned photographer or just getting started, these steps will help you get your photos back on track.
Why Is Lightroom Saying "The File Could Not Be Found"
When you see the "Lightroom The File Could Not Be Found" error, it usually means Lightroom cannot locate a file that was previously available. Lightroom relies on a catalog to track your photos, but it only stores the location and metadata of the files. The actual images themselves are not embedded in the catalog.
If a photo is moved, deleted, or the drive it's stored on becomes unavailable, Lightroom won't be able to find the file. You'll likely see a question mark (?) in the Folders panel or an exclamation mark (!) on the thumbnail in the Grid view.
Common causes behind the "File Could Not Be Found" error:
- Moving Files: If you've moved photos or folders from their original location on your hard drive, Lightroom won't be able to trace them.
- Deleted Files: Accidentally deleting files from your computer or external storage can trigger this error.
- External Drives Disconnected: If the external hard drive or USB flash drive where your photos are stored gets disconnected, Lightroom can’t access those files.
- Renaming Files or Folders: Changing the name of a file or folder in the file explorer can break the link between Lightroom and the photos.
Common symptoms of Lightroom missing files:
- A question mark next to folders in the Folders panel.
- An exclamation mark next to photos in Grid View or Filmstrip.
- The "The file could not be found" in Lightroom Classic error message when trying to edit the photo in the Develop module.
- Lightroom shows the thumbnail preview of the missing photo but prevents any editing or access.
How to Find Missing Files in Lightroom (6 Ways)
How to fix the Adobe Lightroom The File Could Not Be Found error? To avoid Lightroom ‘file could not be found’, you can recover deleted image files and folders and then re-import them into Lightroom. Let's learn 6 different ways on how to fix file cannot be found in Lightroom.
First, please chech your computer's Recycle Bin/Trash, or a backup folder if available. Also, you can find lost photos through the error message dialog box that displays the path to the file's previous location. You can recover deleted photos from Lightroom cloud storage,
Way 1. Recover Missing Photos in Lightroom with Data Recovery Software
is a highly rated recovery tool that can help you retrieve lost image files in Lightroom. It works on both Windows and macOS and is compatible with a variety of storage devices, including memory cards, SSDs, hard drives, and USB drives.
With the right recovery software, you can retrieve these files before new data overwrites them. One of the best tools for this is MyRecover, which boasts a high success rate in recovering lost or deleted files, while also preserving their original format.
- ★ Why choose MyRecover:
- Recover 1000+ File Types: Recover not just photos but also documents, videos, audio, and other file types.
- Scan for Lost Files: MyRecover scans both your device’s internal and external storage devices, allowing you to recover files lost from various types of media.
- Support Multiple Data Loss Scenarios: Whether you’ve lost data due to accidental deletion, a virus, or a formatted hard drive, MyRecover can help.
- Support Various File Systems: It works with NTFS, FAT32, exFAT, and other file systems on Windows 11, 10, 8, 7, and Windows Server.
- Free Recovery: Get 500MB of free recovery space to restore deleted photos.
Download MyRecover on your Windows computers to recover missing photos and files in Lightroom for free.
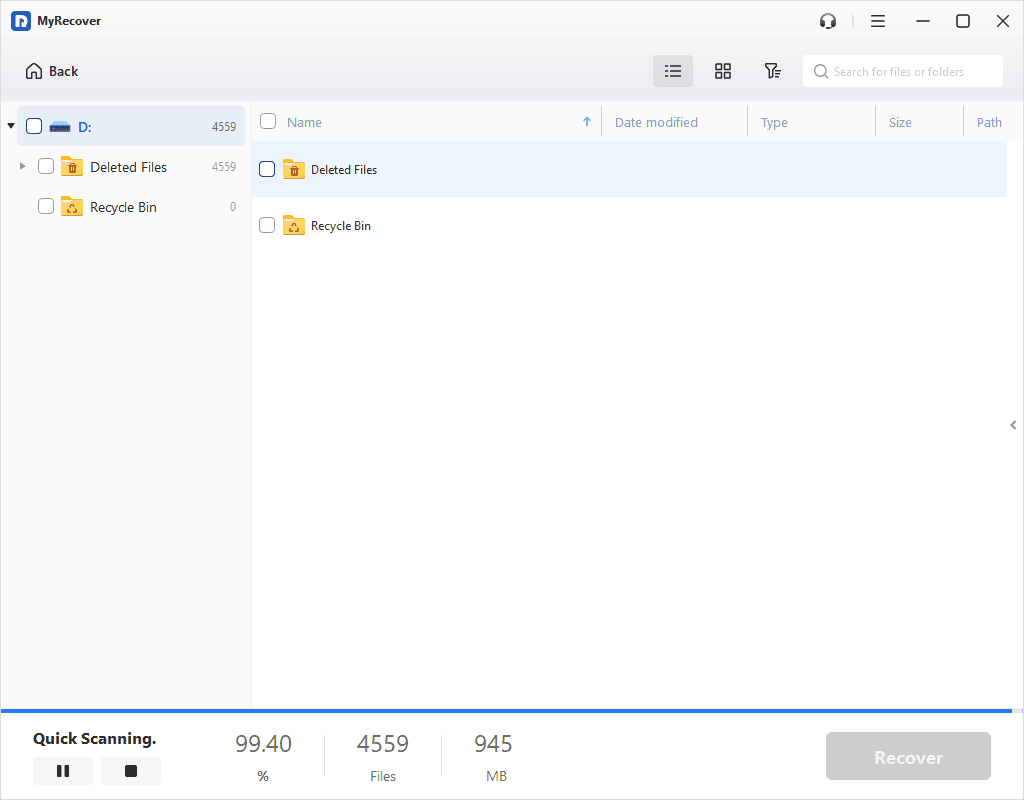
Step 1. Scan the Drive
Install and launch MyRecover. After opening the software, navigate to Advanced Recovery > Disk Data Recovery. Select thedrive or location where your Folder Lock files were stored and click Scan.

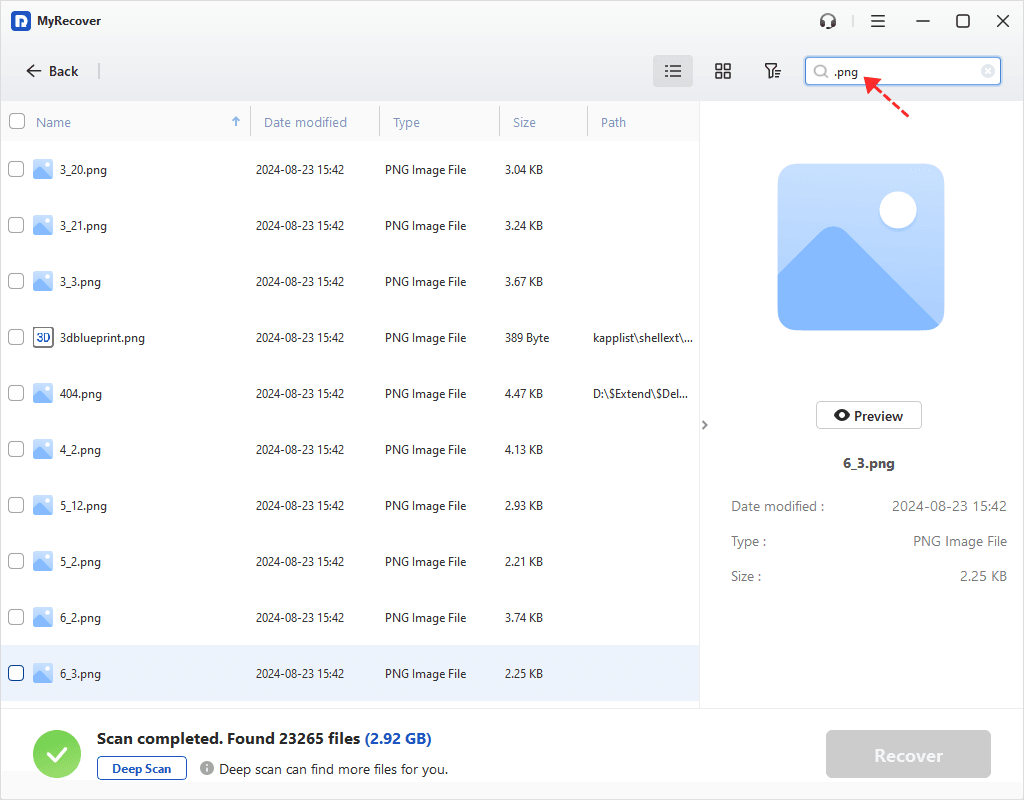
Step 2. Filter and preview photos
The software uses advanced scanning algorithms for Quick & Deep scanning of storage devices to locate your missing files. You can preview the photos before restoring them, ensuring that you recover only the files you need.
- Type: Select the file type (Images, Videos, Documents, Audios, Mails, Webpages, Compressed files, etc.)
- Date modified: Set the date (today, yesterday, last 7/30 days, etc.)
- Size: Filter the file size (<128KB, 128KB~1MB, 1MB~ 512MB, 512MB above, etc.)
Step 3. Recover lost files in Lightroom
Select the photos you want to recover by checking the boxes next to them and click on Recover X Files. Be sure to save the recovered files in a different location, such as your PC, to avoid overwriting data.
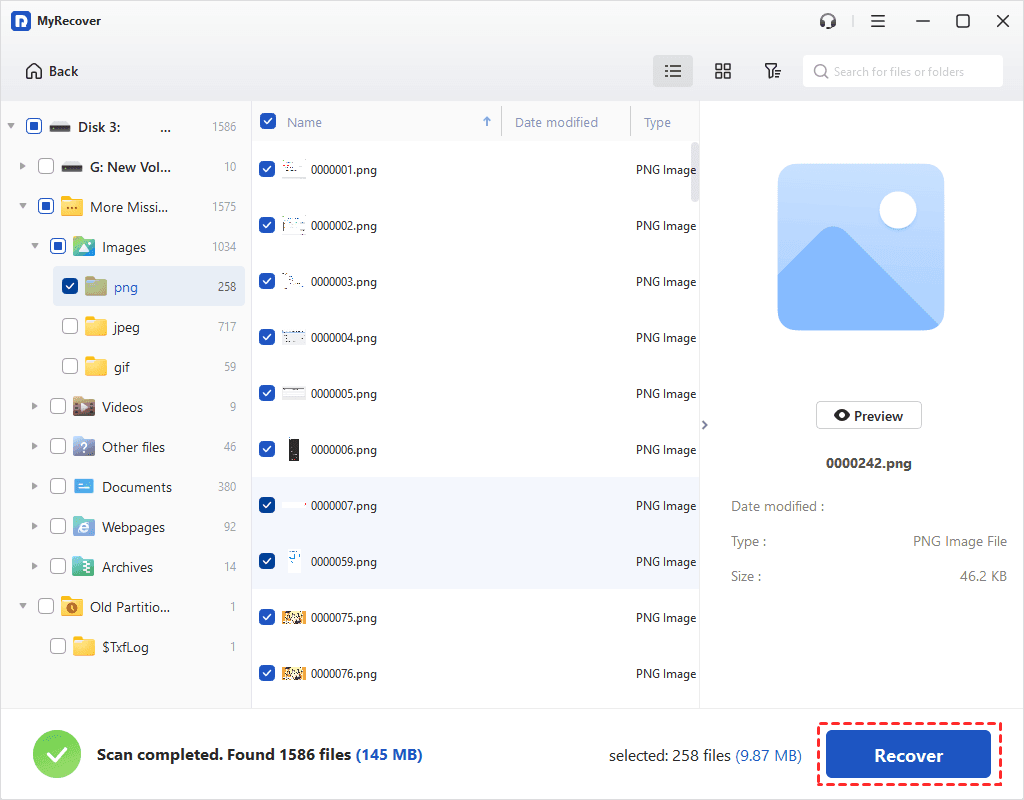
- For unlimited data recovery, please try to upgrade to MyRecover Pro/Tech.
- Except for Windows 7, 8, 10, 11, etc, it still can recover deleted files from Windows Server 2025, 2022, 2019, 2016, 2012, etc.
Way 2. Locate Missing Files with an Exclamation Mark (!) in the Grid View
When individual photos are missing, they’ll display an exclamation mark. If a photo in the Grid View has an exclamation mark (!), you can locate missing files:
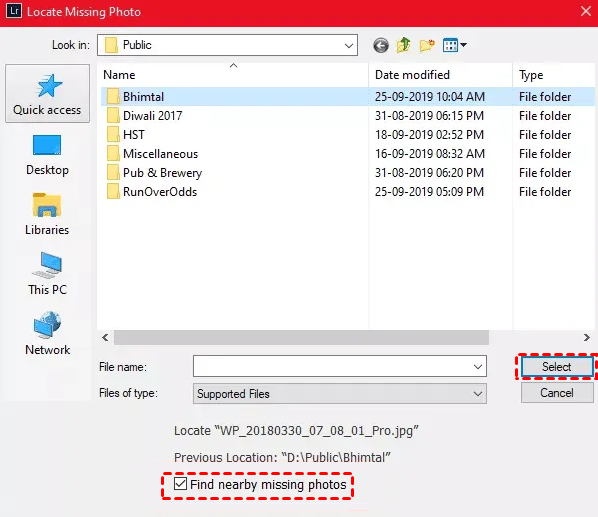
Step 1. Click on the exclamation mark icon on the affected thumbnail.
Step 2. A window will pop up showing the last known location of the missing file.
Step 3. Click Locate, and navigate to the location of the missing file on your computer or external drive.
Step 4. Once the file is found, select it and click Select to restore it to Lightroom. Ensure "Find nearby missing photos" is checked in the Locate dialog box.
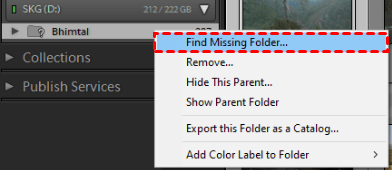
Way 3. Locate Missing Folders with a Question Mark (?)
If a folder in the Folders panel shows a question mark (?), follow these steps to locate the missing folder and restore the link in the catalog:
Step 1. Right-click the folder with the question mark icon.
Step 2. Select Find Missing Folder from the context menu. Navigate to the folder's original location and click Choose.
Way 4. Move Files or Folders Back to Their Original Location
If you moved a folder or photo using File Explorer, you can return it to its original location instead of manually linking it in Lightroom. Here’s how to fix "Lightroom The File Could Not Be Found" error.
Step 1. In Lightroom, locate the last known location of the missing file. Open File Explorer and search for the file or folder.
Step 2. Once found, right-click it and choose Open file location. Move the file or folder back to its original location.
Way 5. Rename Photos to Match Lightroom’s Reference
If you renamed the photo outside Lightroom, rename it back to its original name as it appears in the catalog:
Step 1. Find the missing photo’s location in Lightroom and note its original name.
Step 2. Go to the location and rename the photo to match the original name in Lightroom.
Way 6. Restore Deleted Photos from Lightroom Cloud
If your photos were synced with Lightroom’s cloud storage, you can restore them within 60 days of deletion. This method works for Lightroom Desktop, Lightroom Mobile, and Lightroom Classic. Here are steps to recover deleted photos in Lightroom:
Step 1. Open Lightroom and go to My Photos.
Step 1. Select Deleted from the drop-down menu to see photos that have been removed.
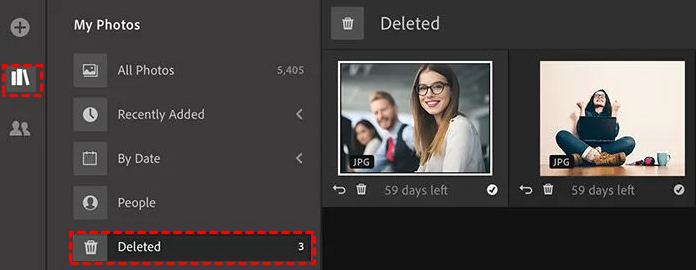
Step 2. Choose the photos you want to restore and click the Restore icon.
Step 3. The photos will return to All Photos or their original albums. If you want to restore everything, click the three dots in the top-right corner and select Restore All.
How to Prevent Lightroom Missing File Errors
Once you’ve recovered your missing files, you’ll want to ensure this doesn’t happen again. Here are some steps you can take to keep your files safe:
1. Keep Your Files Organized
Always keep your files in a well-organized structure. Don’t move or rename files outside Lightroom. Lightroom is best at managing files when everything stays within its catalog.
2. Backup Your Lightroom Catalog and Photos Regularly
Set up a backup system to avoid losing any of your work. Use cloud storage like Google Drive, Dropbox, or iCloud, or external drives to back up both your photos and Lightroom catalog.
3. Avoid Disconnecting External Drives While Lightroom is Open
If you store photos on an external drive, make sure it’s always connected before opening Lightroom.
4. Rename Files and Folders in Lightroom
If you need to rename a file or folder, do it from within Lightroom instead of using File Explorer or Finder.
Conclusion
The "Lightroom The File Could Not Be Found" error can be a real headache, but with the right methods, you can recover missing files and photos and fix this error. MyRecover is a powerful tool that makes the recovery process easier by scanning and retrieving lost data. Why not download it today and see how it works?
Make sure to back up your files and keep your folders and photos organized to avoid this issue in the future. By following the steps outlined above, you should be able to quickly get back on track and keep your Lightroom catalog running smoothly.
FAQs on Lightroom File Recovery
1. What is the "Lightroom The File Could Not Be Found" error?
This error occurs when Lightroom cannot locate a file or folder that was previously part of your catalog. It usually happens if files have been moved, renamed, deleted, or if external drives are disconnected.
2. How do I find missing Lightroom photos?
You can use Lightroom's Find Missing Folder or Locate Missing Photo options to restore lost files. If files are deleted, you may need to recover them from the Recycle Bin or use a recovery tool like MyRecover.
3. Can MyRecover recover Lightroom files?
Yes, MyRecover can recover lost or deleted Lightroom files, even if they’ve been removed from the Recycle Bin or Trash. It scans your drives for recoverable files and lets you restore them easily.
4. How can I prevent Lightroom file errors?
To prevent Lightroom errors, keep your files organized, avoid moving or renaming them outside Lightroom, regularly back up your data, and never disconnect external drives while using Lightroom.
5. What should I do if I accidentally deleted a Lightroom photo?
If you deleted a Lightroom photo, check the Recycle Bin or Trash first. If the file isn’t there, use a data recovery tool like MyRecover to recover the deleted photo.

