
How to Recover Data From NTFS Hard Drive | Free NTFS Recovery Tool
Learn how to recover lost or corrupted data from an NTFS partition with this step-by-step guide. Discover effective methods to restore your important files and avoid data overwriting to safely retrieve your lost information.
By Emma / Updated on March 7, 2025
Overview of NTFS (File System)
NTFS (New Technology File System) is a file system developed by Microsoft, and it has since become the default file system for Windows operating systems. It offers numerous features that make it more advanced than older file systems like FAT16 and FAT32, including:
- File Size and Volume Support: NTFS supports much larger file sizes and volumes compared to FAT32. While FAT32 is limited to a maximum file size of 4GB and volume size of 8TB, NTFS can handle files up to 16 exabytes and volumes up to 256 terabytes.
- Security: NTFS provides advanced security features, including file and folder permissions (ACLs) and encryption (EFS), which are not available in FAT32. This allows for better control over who can access and modify files.
- Reliability: NTFS uses journaling to track changes, helping prevent file corruption during system crashes or power failures. FAT32 lacks this feature, making it more prone to data corruption.
- Disk Quotas and Compression: NTFS allows administrators to set disk quotas and offers built-in file compression to save space. FAT32 does not have these features.
How to Recover Data from NTFS Partition?
When dealing with data loss from an NTFS partition, the approach can vary greatly depending on whether the partition is visible or invisible in File Explorer. The solutions for recovering lost data from a visible partition are quite different from those for an inaccessible or invisible one.
In the first case, where the partition is recognized but files are lost or corrupted, you can use built-in Windows tools or data recovery software to restore your files. However, when the NTFS partition is not visible, you must take steps to make them visible in Windows, and then you may get the files back again. Let’s explore the different scenarios and the corresponding recovery methods for each.
Scenario 1: Recover Files from NTFS Partition (Visible in File Explorer)
In this case, the NTFS partition is visible in "File Explorer", but you may have lost or accidentally deleted files. Here's how you can recover your data:
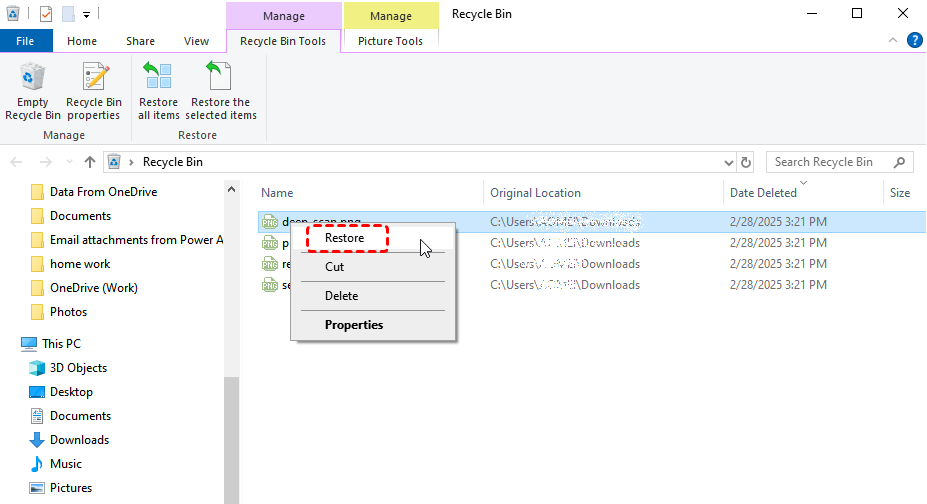
A. Check the Recycle Bin
If the files were recently deleted, they may still be in the "Recycle Bin". Open the "Recycle Bin", locate the deleted files, right-click, and select "Restore."
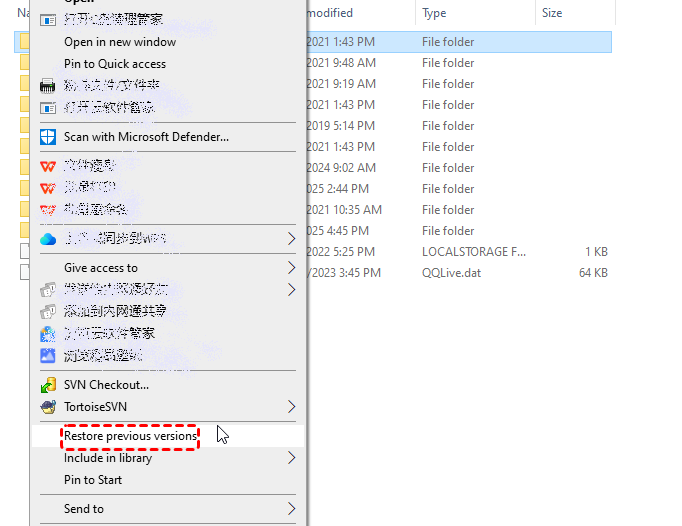
B. Use Windows File History (If Enabled)
Once enabled, the Windows inbuilt tool - File History will automatically back up files and allow you to restore previous versions. Right-click on the folder in NTFS partition where your files were stored, select “Restore previous versions”, and choose a version from before the data loss to restore the files.
C. Use Windows File Recovery
If the files are not in the Recycle Bin, recoverable via File History, you can use Windwos File Recovery tool to scan the NTFS partition and retrieve lost files. This is a command tool to help Windows users to recover lost files that have been deleted from local storage device (including internal drives, external drives, and USB devices) and cannot be restored from Recycle Bin.
Step 1.Download Windows File Recovery from Microsoft Store and install it.
Step 2. Run Command Prompt as an administrator.

Step 3. In the Command Prompt window, input the following command and press on Enter.
winfr C: D: /n \Users\YourName\Documents\*.xlsx
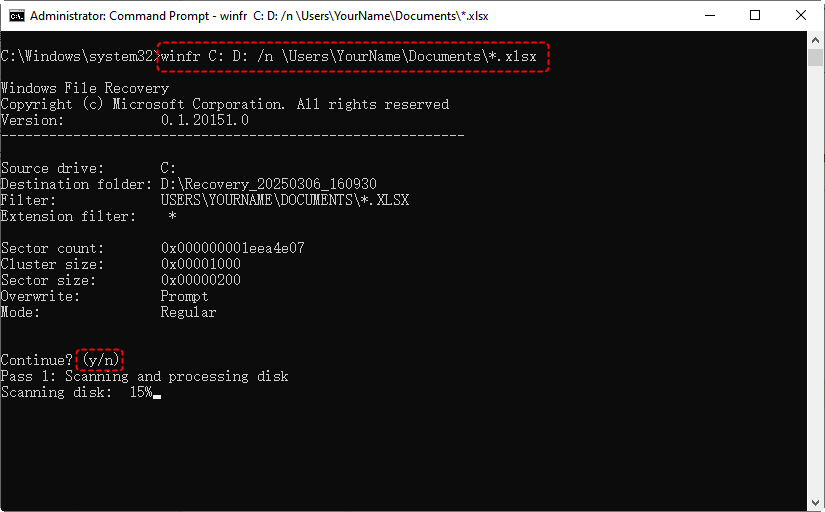
Step 4. After you run the command, the tool will begin scanning the source drive. The progress will be displayed in the command prompt window.
Command explanation: This will scan your "C:" drive for Excel files (.xlsx) and attempt to recover them to the "D:" drive. You can change the source / destination drive, and file types based on your specific needs.
Scenario 2: Restore Data from NTFS Partition (Invisible in File Explorer)
If the NTFS partition is not visible in File Explorer (e.g., due to partition corruption, partition deletion, lackage of drive letter, system errors, or drive failure), you may need to follow these steps:
A. Check Disk Management
Sometimes the partition might be there, but it’s not showing in “File Explorer”.
Step 1. Open "Disk Management" (press "Windows + X", select “Disk Management”).
Step 2. Look for the NTFS partition. If it shows as "Unallocated" https://www.myrecover.com/windows-recovery-tips/how-to-recover-files-from-sd-card-after-formatting-7201.htmlor "Raw", do not format it as this will erase all data.
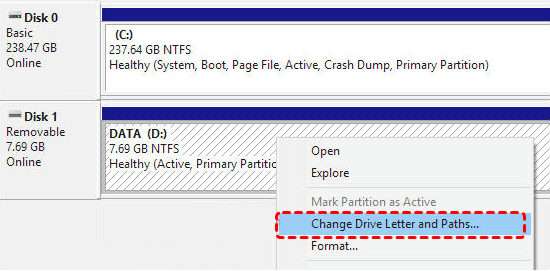
If the partition is present but unrecognized, you can try to “reassign a drive letter”by right-clicking the partition and selecting “Change Drive Letter and Paths”.
B. Use Windows CHKDSK Tool
CHKDSK (Check Disk) is a built-in utility in Windows that helps detect and fix issues related to file systems and hard drives. It is a powerful tool for repairing disk errors, recovering readable information, and ensuring the integrity of the file system on NTFS, FAT32, and exFAT partitions.
Running CHKDSK via File Explorer (For Easy Fixes)
- Open File Explorer and locate the drive you want to check.
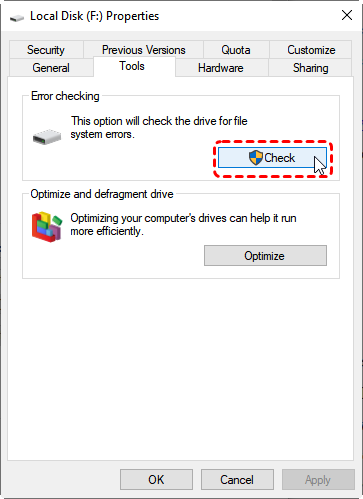
- Right-click the drive and select “Properties”.
- Navigate to the “Tools tab” and click “Check” under the "Error checking" section.
- If Windows detects errors, it will prompt you to repair the drive. Follow the on-screen instructions.
Running CHKDSK from Command Prompt (For Advanced Options)
You can use the Command Prompt to run CHKDSK with additional parameters for a deeper scan and repair.
- Open Command Prompt as Administrator
- Type the command: chkdsk G: /f /r (Replace X with the drive letter of the partition you want to check.)
/f: Automatically fixes any errors it detects.
/r: Locates bad sectors and recovers readable information.

- Press Enter.
C. Rebuild the MBR (Master Boot Record)
Sometimes, the partition may be invisible because the MBR is corrupted. Rebuilding the MBR can help recover the partition.
Step 1. Open "Command Prompt" as Administrator.
Step 2. Run the following command:
bootrec /fixmbr
bootrec /fixboot
bootrec /rebuildbcd
After rebuilding the MBR, check if the partition becomes visible in File Explorer.
All-in-One Solution for Every Scenario: MyRecover
See? Different situation requires different solution when it comes to recovering data from NTFS hard drive. However, today we bring you an all-in-one solution for every NTFS data recovery scenario. That is using MyRecover, a free yet powerful data recovery tool.
It not only restores data from damaged or corrupted NTFS partitions (also supporting FAT32, exFAT, and ReFS) but also recovers accidentally deleted NTFS partitions along with their data, ensuring comprehensive and reliable data restoration. In the following part, we will walk you through every step of recovering data from NTFS hard drive.
Step 1. Download and install MyRecover on your Windows computer.
Step 2. Run it and click the target NTFS partition, then click on “Scan”, which will scan the entire partition for lost data.

Step 3. Once scanning process is finished, all recoverable files will be listed and you can tick the target one and click on “Recover”.

Step 4. Choose a destination drive to save the recovered files.

Step 5. Wait for the process to complete. How long it will take to recover NTFS drive data depends on the amount or size of the recoverable files.

If your NTFS partition is deleted, you can directly go for “Partition Lost Recovery”in the “Advanced Recovery”section, which will search for the lost partition and then recover it along its data.
To Wrap Up
This guide provides an effective solution to recover data from an NTFS hard drive, regardless of the reason for data loss. For a faster and more efficient recovery, MyRecover is your best choice, as it handles various data loss scenarios with ease. This tool can restore different types of data (texts, pictures, videos, audios, emails, compressed files, etc) on different devices (HDD, SSD, USB flash drive, SD card, Camera, PS4/5, drone, CCTV, music/video players, etc).
What’s more, even if you cannot boot your computer as usual, you can use the Advanced Edition to create a bootable media and perform a data recovery then.

