
How to Use Windows File Recovery Command to Recover Lost Files
If you have accidentally lost files and are looking for a data recovery software, Windows File Recovery should definitely be on your list. This article will provide you with a comprehensive guide to Windows File Recovery. It will cover how the command line mode works and offer a step-by-step tutorial on how to use it. Additionally, an alternative tool will also be recommended, giving you more options for file recovery.
By Aria / Updated on April 25, 2025
What’s Windows File Recovery
Windows File Recovery is a command-line data recovery tool developed by Microsoft. Use this app you can recover lost files that have been deleted from your local storage device (including internal drives, external drives, and USB devices) and can’t be restored from the Recycle Bin. It offers several distinct command-line modes, each tailored to specific usage scenarios and file systems.

You may still be wondering about this tool: Can Windows File Recovery recover deleted data, and how to use Windows File Recovery command to recover lost files? This guide will answer these questions in detail and guide you through the process of using Windows File Recovery to recover deleted data.
Basics of Windows File Recovery Command
To ensure successful data recovery, download and install Windows File Recovery on your computer from the official Microsoft channel. It is only compatible with Windows 10 and 11 and is not supported for running on older Windows versions. One thing to keep in mind: never install it on the drive where the deleted data was stored.
The most basic command structure is: winfr source-drive: destination-drive: [/mode] [/switches].
Source-drive: the letter of the drive where the deleted files originally were stored.
Destination-drive: the letter of the drive where the recovered files you want to save (must be a different drive than the source-drive).
/mode: there are 2 basic modes: regular and extensive (segment and signature are advanced syntax).
- Regular mode: standard recovery option for non-corrupted NTFS file system.
- Extensive mode: thorough recovery option suitable for all file systems.
How to Choose Right Recovery Mode
|
File system |
Circumstances |
Recommended mode |
|
NTFS |
Deleted recently |
Regular |
|
NTFS |
Deleted a while ago |
Extensive |
|
NTFS |
After formatting a disk |
Extensive |
|
NTFS |
A corrupted disk |
Extensive |
|
FAT and exFAT |
Any |
Extensive |
/switches: the additional options refines recover results, such as:
/n: use this switch to scan for specific file by using a file name, path, type or wildcards.
/? : this switch provides a summary of syntax and switches for general users, suiting all modes.
Practical Examples: How to Use Windows File Recovery Command to Recover Lost Files
Now that you've understood the basic structure and modes of Windows File Recovery commands, you can start the data recovery process. This section will walk you through how to recover files using Windows File Recovery commands with concrete examples. Run this program by following these steps.
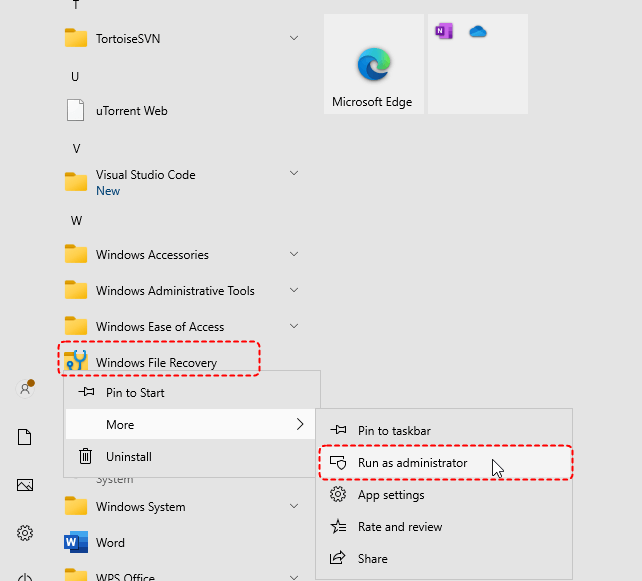
Step 1. Download and install Windows File Recovery on your computer from official channel.
Step 2. Open Windows File Recovery in the start menu.
Step 3. Right-click and choose “Run as administrator”.
Recover All Recently Lost Files from One Drive to Another
You can recover all recently deleted files from the F: drive to the E: drive by executing this command. (In all the following examples, the F: drive is the source drive while E: drive is the destination drive).
Enter the command: winfr F: E: /regular in the opened command window. Regular mode only supports the NTFS file system. If the file system of your drive is FAT or exFAT, you can only use extensive mode.
This command is used to perform a quick scan lost files on F: drive and save them to E: drive.
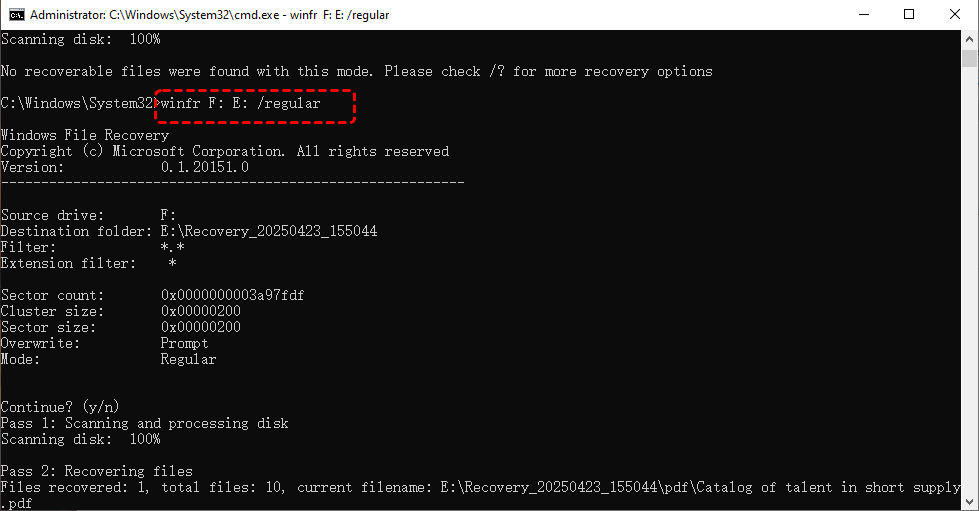
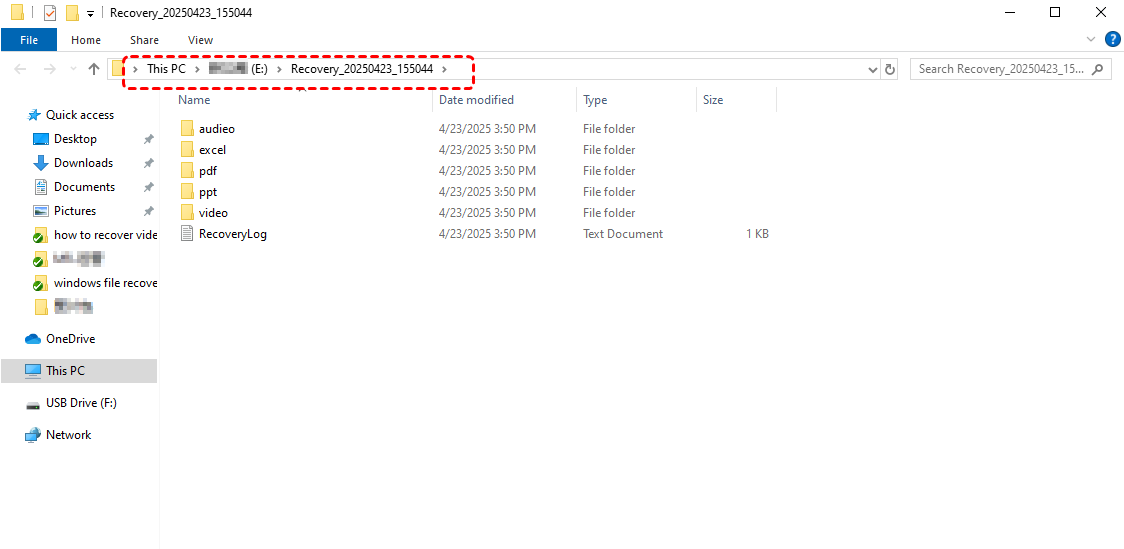
Once the scanning process is completed (reaches 100%), you can locate the recovered files in the designated destination folder.
- Notes:✎...
- Press “y” or “n” to continue the process and check the recovered files.
Recover Files from Specific Folder
By specifying the file path in the command switch, you can recover the files within that path from the F: drive to the E: drive.
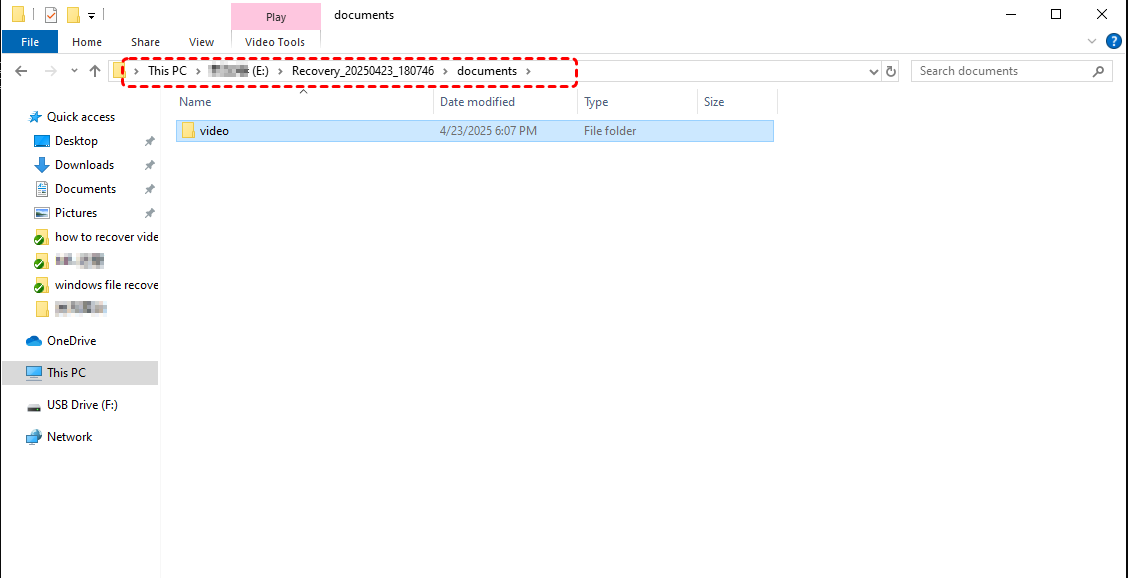
Enter the command: winfr F: E: /Regular /n documents\video\ in the command prompt window.
This command is used to perform a quick scan all files within documents> video folder on the F: drive and save them to E: drive.
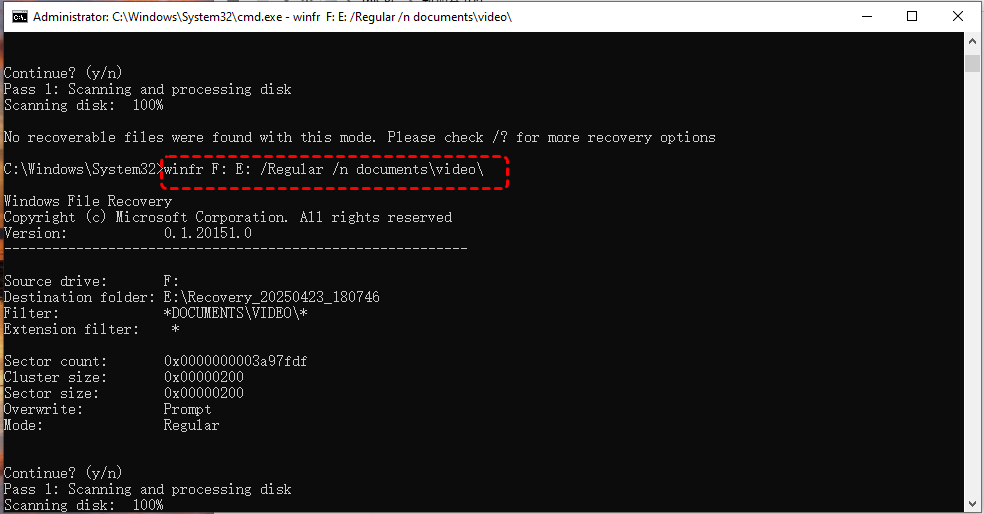
Press “y” to the destination folder to check the recovered files.
Recover Specific Files Using File type
Add file types like docx, txt, excel, ppt, mp3, mp4, etc. to the command switch. This allows you to recover files with these types from the F: drive to the E: drive.
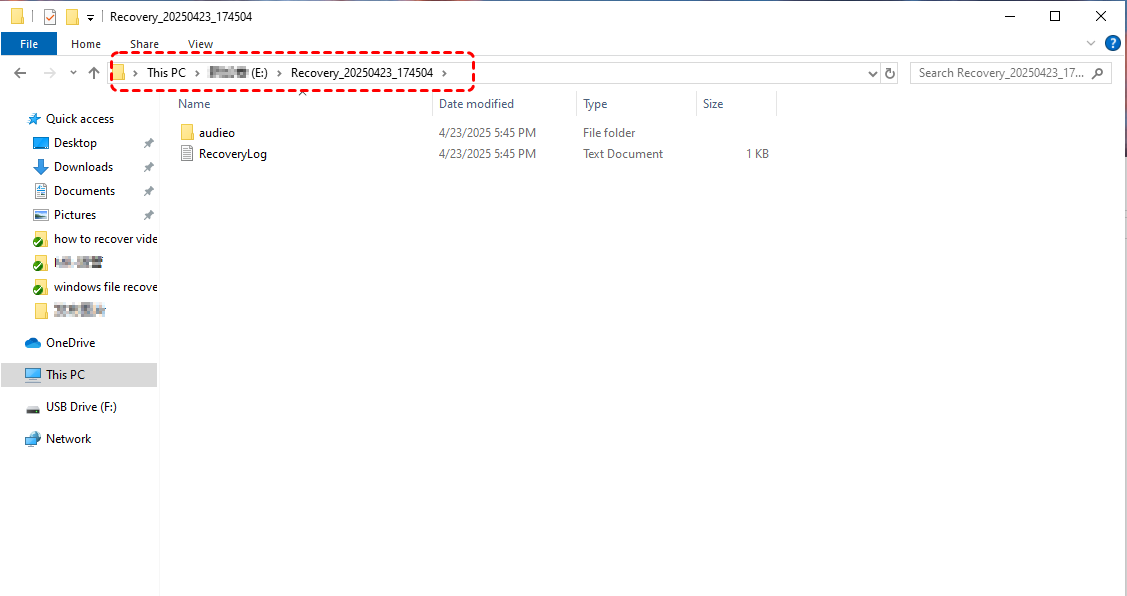
In the command prompt window, enter the command: winfr F: E: /Regular /n *.mp3.
This command is used to perform a quick scan of F: drive for all mp3 files and save them to F: drive.
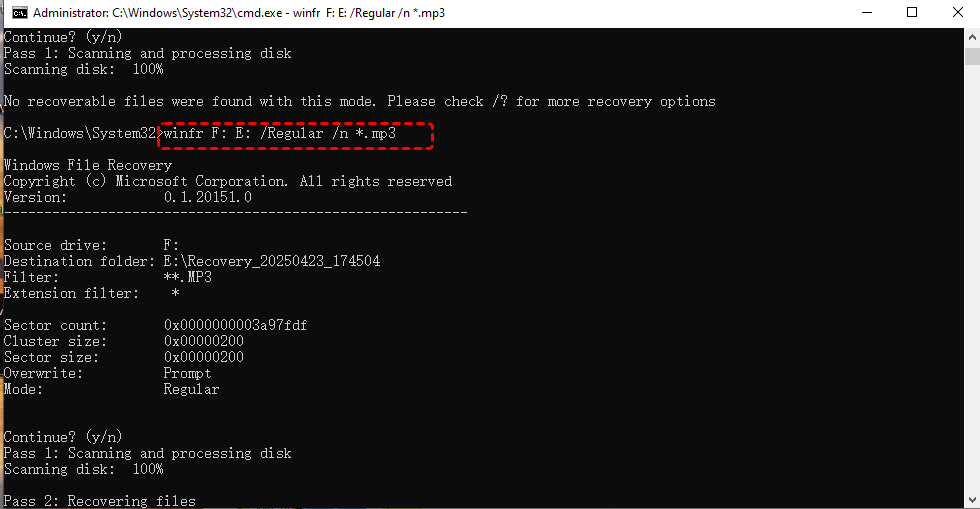
Press “y” to the destination folder to check the recovered files.
Recover Specific Files by File Name
By specifying the file name and file type in the command switch, you can precisely recover the specific file from the F: drive to the E: drive.
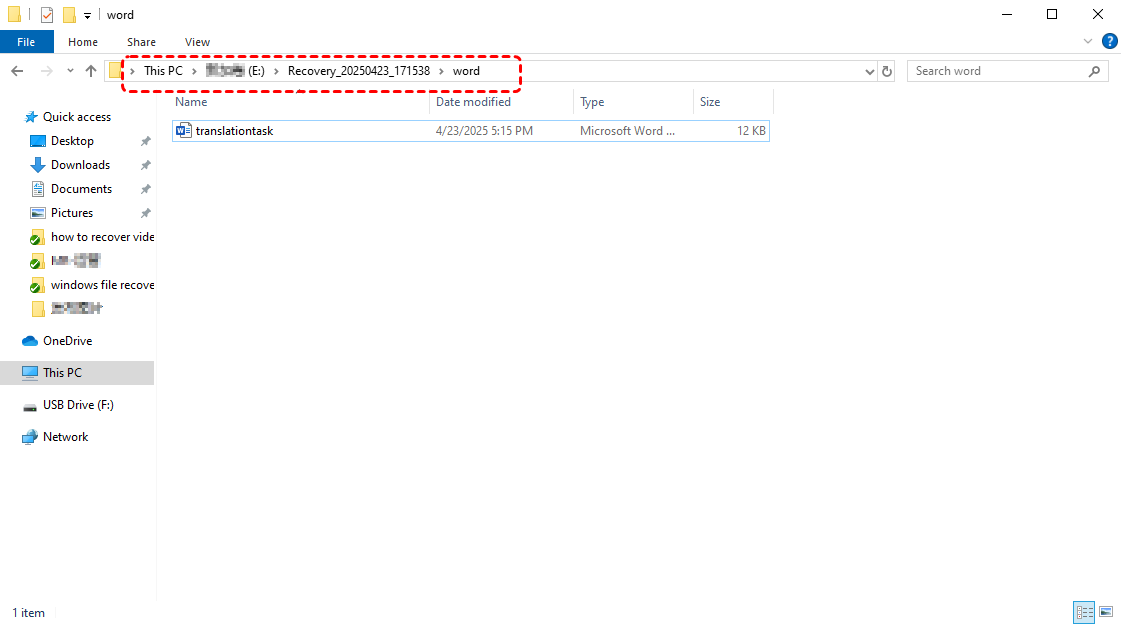
Enter the command: winfr F: E: /Regular /n translationtask.docx in the opened command window.
This command is used to perform a quick scan of F: drive for traces of the deleted file “translationtask.docx” and restore it to E: drive.

After the scan, check the recovered files from the designed destination folder.
Similarly, if you wish to perform a deep scan for lost files, you can execute the "extensive" mode in the same manner. However, patience is required, as this mode retrieves a larger volume of data and consequently takes longer to complete.
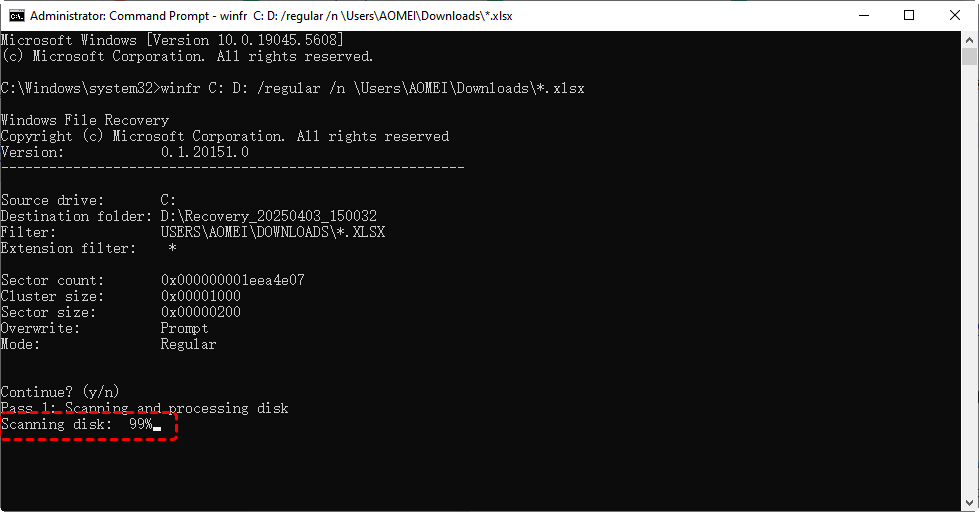
Windows File Recovery Command Stuck or Not Working?
After learning how to use the Windows File Recovery command, you may encounter some issues while running it that prevent successful file recovery. For instance, Windows File Recovery stuck at 99% or 0%, or encounter an error while parsing the command. These are common problems users face when using Windows file recovery.
To resolve these issues, you can take the following steps: ensure that the connection to the external drive is working properly, verify the accuracy of the entered command mode, and check for problems like incorrect drive letters, spelling errors, and other potential issues. If none of these methods can resolve the issue, you can opt for other data recovery tools, such as MyRecover.
Alternative Tool to Winfr Commands: MyRecover
There's no doubt that Windows file recovery, as a command - line data recovery tool, is highly professional. However, many users complain that its command - line interface is overly complex and difficult to understand. Even a single spelling error can halt the recovery process, making it rather unfriendly to computer beginners. So, are there any data recovery tools that are more user-friendly? In answering this query, we turn to MyRecover, a third - party data recovery application.
Unlike Windows File Recovery Command Line, MyRecover features a graphical user interface (GUI). This makes it significantly more user - friendly, enabling both tech - savvy individuals and novices to recover deleted data effortlessly, without the need for a steep learning curve.
Step 1. Download and install MyRecover on your computer. Do not install on the drive where the data was deleted.
Step 2. Select the location to search where the deleted files were stored.

Step 3. Choose the files you want to recover and click “recover”.

Step 4. Select a different drive to save the recovered files.

Once the process complete, you can navigate the recovered files in the recovery folder.

Summary
After familiarizing yourself with the Windows File Recovery commands and operations, it becomes evident that Windows File Recovery command prompt demands a certain level of technical expertise from users, presenting a relatively high usage threshold. In contrast, MyRecover is a data recovery solution designed for users of all skill levels. Even without extensive prior knowledge, users can quickly get up to speed with MyRecover. For those with more advanced requirements, it offers Professional and Technician editions, ensuring that diverse user needs are comprehensively met.

